Transforming a room’s atmosphere often begins with its lighting. While traditional fixtures illuminate directly, cove lighting offers a sophisticated alternative, bathing your space in a soft, ambient glow that instantly elevates its aesthetic. This indirect lighting technique, where light sources are cleverly concealed within architectural features, creates a serene and inviting environment, reducing harsh shadows and glare. If you’re looking to infuse your home with warmth, depth, and a touch of elegance, mastering the art of cove lighting with LED strips is your next essential DIY project.
Understanding the Magic of Cove Lighting
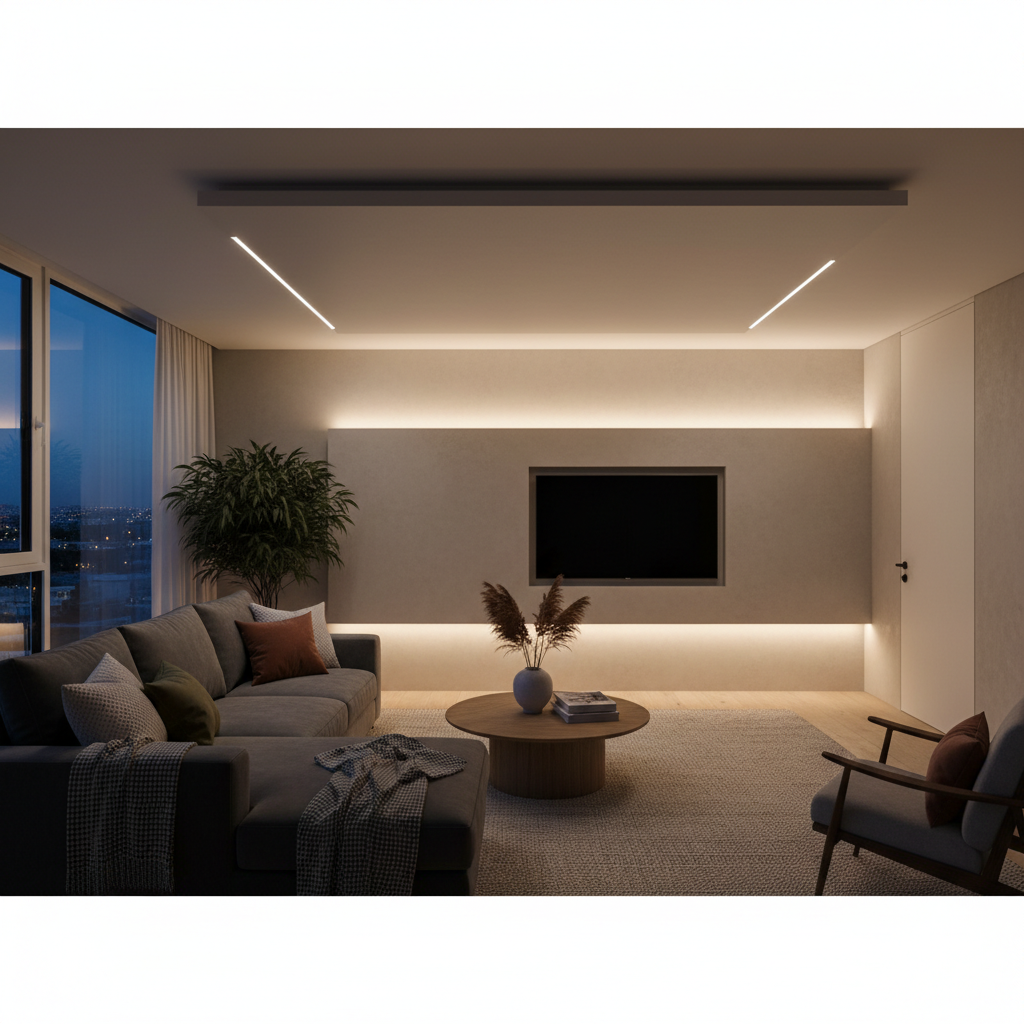
Cove lighting is an interior design technique that involves installing light fixtures into ledges, recesses, or architectural elements, directing light upwards towards the ceiling or adjacent walls. The light then reflects off these surfaces, diffusing throughout the room to create a gentle, uniform illumination. This method effectively hides the light source itself, allowing the light to become an integral part of the architecture rather than a visible fixture.
The effectiveness of cove lighting lies in its inherent indirectness. By bouncing light off surfaces, it naturally softens and spreads, making rooms feel larger, more open, and incredibly inviting. This technique is particularly beneficial in living rooms, bedrooms, and media rooms, where a calm and relaxing ambiance is desired. Modern LED technology further enhances cove lighting, offering energy efficiency, longevity, and a vast spectrum of colors and brightness levels to precisely tailor the mood of any space.
Choosing the Right LED Strips for Your Cove
The heart of any successful cove lighting project is the LED strip light. With an array of options available, selecting the perfect strip depends on your desired effect and the specific needs of your space.
Purpose and Brightness (Lumens)
First, consider the primary function of your cove lighting:
- Ambient/Mood Lighting (100-300 lumens per foot): For a subtle, soft glow that sets a relaxed mood, ideal for bedrooms or intimate dining areas.
- Accent Lighting (200-500 lumens per foot): To highlight architectural details, artwork, or specific features, adding visual interest without overwhelming the space.
- General/Principle Lighting (400-1000 lumens per foot): When cove lighting is intended as the main light source, requiring higher lumen output to adequately illuminate the room.
|
Our Picks for the Best Living room ceiling light in 2026
As an Amazon Associate I earn from qualifying purchases.
|
||
| Num | Product | Action |
|---|---|---|
| 1 | Amico 24 Pack 6 Inch 5CCT Ultra-Thin LED Recessed Ceiling Light with Junction Box, 1050LM Brightness, Dimmable Canless Wafer Downlight, 12W, ETL&FCC |

|
| 2 | Shine LUEST Modern LED Ceiling Light, Dimmable LED Chandelier Flush Mount Ceiling Lights, Remote Control Acrylic Ring Ceiling Lamp Fixture for Living Room Dining Room Bedroom (White, 8 Rings) |
|
| 3 | Modern LED Ceiling Light 7 Rings Dimmable Fixtures with Remote Black Close to Ceiling Light 31.8" 130W 3000K-6500K Flush Mount Ceiling Lamp for Living Room,Bedroom,Kitchen |
|
| 4 | 36W Modern LED Ceiling Light Fixture, 19.7Inch Curved Wave Ceiling Lamp with Remote for Bedroom, Kitchen, Hallway, Foyer Library Dining Room Silver 6000K Modern Ceiling Light Fixture |
|
| 5 | MEIXISUE Gold Modern Sputnik Chandelier Ceiling Light Fixtures,6-Lights Industrial Metal Semi Flush Mount Ceiling Light for Bedroom Dining Room Living Room Kitchen Hallway UL Listed |
|
| 6 | RUIYEY Modern Chandelier Ceiling Light Fixture Sputnik Chandeliers Gold and Black Farmhouse Chandelier Over Table 12-Light Height Adjustable Chandeliers for Dining Room, Living Room,Kitchen Island |
|
| 7 | 33" Modern Chandelier Ceiling Light Fixture, 12-Light Sputnik Chandeliers Brushed Gold and Black Mid Century Chandelier Over Table, Height Adjustable Chandeliers for Dining Room Living Room Kitchen |
|
| 8 | Modern LED Ceiling Light for Bedroom 31.5" Black Kitchen Lighting Fixtures Ceiling 3000-6500K Dimmable Square Ceiling Light with Remote Control for Living Room, Dining Room, Kitchen |
|
| 9 | Shine LUEST Modern LED Ceiling Light Fixture Black Kitchen Lighting Fixtures Ceiling for Bedroom 31.5" Dimmable 6 Ring Square Ceiling Light for Kitchen with Remote Control for Living Room,Dining Room |
|
| 10 | Modern Ceiling Light, 36.2'' LED Dimmable Acrylic Square 6+1 Rings Ceiling Lights with Remote, Black Flush Mount Ceiling Light Fixture for Low Ceiling Bedroom Living Room Dining Room, 130W |
|
Color Temperature (CCT)
Color temperature, measured in Kelvin (K), significantly influences the ambiance:
- Warm White (2700K-3000K): Emits a soft, yellowish light, perfect for creating a cozy, inviting, and relaxing atmosphere, reminiscent of incandescent bulbs. This is often preferred in residential settings like living rooms and bedrooms.
- Cool White (4000K+): Provides a brighter, more bluish-white light that enhances focus and alertness, suitable for task-oriented areas like kitchens or modern workspaces.
- Tunable White: Offers flexibility, allowing you to adjust the color temperature from warm to cool based on the time of day or desired mood.
It’s often a good idea to match the color temperature of your cove lighting with other existing light sources in the room for a harmonious look.
Voltage, CRI, and Water Resistance
- Voltage: Most LED strips come in 12V or 24V. For longer runs typically found in cove installations, 24V strips are generally recommended as they help minimize voltage drop, ensuring consistent brightness along the entire length.
- Color Rendering Index (CRI): Aim for an LED strip with a CRI of 90 or higher. A high CRI ensures that colors in your room appear true to life under the LED illumination, rather than looking washed out or distorted.
- Water Resistance: If your cove lighting project is in a bathroom, kitchen, or any outdoor area exposed to moisture, ensure you select LED strips specifically rated for water resistance (e.g., IP65 or higher).
Designing Your Cove Lighting for Impact
Creating truly effective cove lighting goes beyond simply sticking LED strips into a recess. Thoughtful design ensures the light source remains hidden and the resulting glow is flawless.
Concealment is Key: The Line of Sight Principle
The fundamental rule of cove lighting is to conceal the light source entirely. The viewer should only see the diffused light reflecting off surfaces, not the individual LEDs or fixtures. Before installation, consider all possible viewing angles from different positions within the room. A simple mock-up can help determine the ideal lip height and recess depth to ensure the light source remains hidden from every vantage point. If individual LED “dots” are still visible, consider using LED channels with diffusers or opting for “dotless” COB (Chip-on-Board) LED strips.
Optimal Placement and Angle
Cove lighting can be integrated into various architectural elements:
- Ceiling Perimeters: The most common application, where strips are placed along the edges of a ceiling, shining upwards or outwards.
- Crown Molding: A popular DIY option involves building a small ledge behind existing or new crown molding to house the LED strips.
- Floating Shelves or Cabinets: To add an ethereal glow beneath or above furniture.
- Recessed Areas: Custom-built niches or valances specifically designed for indirect lighting.
The direction of the light is crucial. Directing light towards a ceiling or wall allows for a broader, softer diffusion. Experiment with the angle to achieve your desired spread and intensity.
Reflective Surfaces and Cove Dimensions
The surfaces within your cove significantly impact the final light output. Lighter colors, especially matte white paint, act as excellent reflectors, amplifying the brightness and ensuring a smooth, even light distribution. Darker or glossy surfaces can absorb light and create unwanted reflections or “hot spots.”
For optimal light dispersion and ease of maintenance, consider the “150mm rule” as a general guideline. This suggests maintaining approximately 150mm (about 6 inches) for the key dimensions of the cove, such as the distance between the light source and the ceiling, and the depth of the recess. More space generally allows the light to project farther, while less space creates a more focused, intense glow.
“Cove lighting is not merely about adding light; it’s about shaping space with light, creating mood, and highlighting the inherent beauty of a room’s architecture.” – Lighting Design Expert
Essential Components for Installation
Before you begin, gather all necessary components:
- LED Strip Lights: Your chosen brightness, color temperature, and voltage.
- LED Power Supply (Driver): Converts your household AC power to the low-voltage DC required by the LED strips. Ensure its wattage capacity exceeds your total strip wattage by at least 20% to prevent overloading.
- Control System: This could be a dimmer switch (wall-mounted or inline), a smart home controller, or a remote control, allowing you to adjust brightness and color (if using RGB or tunable white strips).
- Wires and Connectors: Low-voltage wires and solderless connectors for easy, secure connections between strip segments and to the power supply.
- Mounting Channels/Extrusions (Optional but Recommended): Aluminum channels provide a stable mounting surface, act as a heat sink to prolong LED lifespan, and can hold diffusers for a more uniform light output.
- Materials for the Cove Structure: This could be wood (plywood, MDF), plasterboard, or pre-made crown molding with a built-in channel.
- Basic Tools: Measuring tape, pencil, level, drill, saw (if building a cove), wire strippers, screwdriver, and possibly a stud finder.
Step-by-Step Installation Guide
While complex wiring might warrant a professional, many cove lighting installations are achievable for a skilled DIYer.
-
Plan Your Layout and Measurements:
- Measure the total length of the area where you want to install the cove lighting.
- Mark the exact placement of your cove structure on the wall or ceiling, ensuring the light source will be hidden from all viewing angles.
- Identify the location for your power supply, ideally close to the start of your LED run, and plan the route for your low-voltage wiring back to a power outlet or switch.
-
Prepare or Build the Cove Structure:
- If using existing crown molding, ensure there’s enough space behind it to house the LED strip and direct light upwards. You might need to add a small ledge.
- If building a custom cove, construct a sturdy recess or ledge using wood or plasterboard. Secure it firmly to wall studs or ceiling joists.
- Paint the interior surfaces of your cove with a matte white paint. This maximizes light reflection and diffusion.
-
Mount the Power Supply and Run Wires:
- Install the LED power supply in a discreet yet accessible location that allows for proper ventilation (e.g., inside a cabinet, a false ceiling void, or a utility closet).
- Run the low-voltage wires from the power supply output to the starting point of your LED strip installation. Ensure wires are concealed within walls or architectural elements. If running long distances, consult a voltage drop chart to use the appropriate wire gauge.
-
Install Mounting Channels (If Using):
- Cut aluminum channels to the required lengths using a miter saw or hacksaw. For clean corners, miter cuts are recommended.
- Secure the channels into your prepared cove using mounting clips or by screwing them directly into the structure. Ensure they are aligned and secure.
-
Install LED Strip Lights:
- Clean the mounting surface (inside the cove or channel) thoroughly with an alcohol-based solution to ensure the adhesive backing adheres properly.
- Carefully peel the adhesive backing from the LED strip and press it firmly into place along the inside of your cove or channel. Work in sections to prevent air bubbles.
- Cut LED strips only at designated cut marks to maintain functionality. Use solderless connectors to join multiple strip segments or to connect to the power supply wires, ensuring correct polarity (+ to + and – to -).
-
Connect Wiring and Control System:
- Connect the output wires from your power supply to the LED strip’s input wires using appropriate connectors.
- Install your chosen control system (dimmer switch, smart controller) according to the manufacturer’s instructions. If using a wall dimmer, ensure it’s compatible with your LED driver. For complex wiring, consider hiring a licensed electrician.
-
Test and Adjust:
- Before sealing up your cove or making any permanent finishes, restore power and test the entire lighting system.
- Check that all LED segments illuminate evenly and that any dimming or color-changing functions work as expected. Make any necessary adjustments to strip placement or wiring for optimal light distribution and to eliminate hotspots.
Tips for a Professional Finish
- Test Thoroughly: Always test your lights at each stage of installation.
- Mind the Corners: Use flexible connectors or miter-cut channels to ensure seamless transitions around corners.
- Cleanliness: A clean mounting surface is critical for the LED strip’s adhesive to last.
- Consider a Diffuser: If you can still see individual LED dots, especially on closer inspection, a diffuser lens inside an aluminum channel can create a smoother, more continuous line of light.
Conclusion
Creating cove lighting for an ambient glow is a rewarding project that can dramatically enhance the comfort and sophistication of your home. By understanding the principles of indirect lighting, carefully selecting your LED strips, and meticulously planning your installation, you can achieve a professional-looking finish that transforms your living spaces. The subtle, diffused light eliminates harshness, accentuates architectural details, and envelops any room in a warm, inviting embrace. Embrace this elegant lighting solution and discover how a hidden light source can reveal the true beauty of your home.
Are you ready to cast a new light on your living space with the magic of cove lighting?
Frequently Asked Questions
What is the ideal distance for cove lighting from the ceiling?
The ideal distance for cove lighting from the ceiling typically ranges from 4 to 6 inches (100-150mm). This distance allows the light to spread effectively across the ceiling, creating a soft, diffused glow without being too intense or leaving dark spots. Adjusting this distance can alter the spread and intensity of the light, so testing with a mock-up is always recommended.
Can I install cove lighting myself?
Yes, installing LED cove lighting is a popular DIY project, especially when using flexible LED strip lights with adhesive backing. Many manufacturers provide easy-to-follow instructions and solderless connectors. However, if the project involves complex electrical wiring or custom architectural modifications, consulting or hiring a licensed electrician or contractor is advisable for safety and optimal results.
What kind of lights are best for cove lighting?
LED strip lights are overwhelmingly considered the best choice for modern cove lighting. Their flexibility allows them to conform to various shapes, they are energy-efficient, offer a wide range of brightness and color temperatures, and have a long lifespan. They can be easily cut to size and mounted discreetly within coves, ledges, or architectural recesses.
How do I hide the wires for cove lighting?
Wires for cove lighting are typically hidden within the cove structure itself, run behind crown molding, inside walls, or within dedicated wiring channels. For a clean, professional look, plan wire routes carefully during the design phase, ensuring they are concealed from view and safely routed to the power supply and control system.
What are common mistakes to avoid in cove lighting?
Common mistakes include visible LED “dots” due to improper concealment or lack of diffusers, uneven light distribution from incorrect spacing or non-reflective surfaces, and “hot spots” caused by lights being too close to the reflective surface. Poor electrical connections, overloading the power supply, and neglecting ventilation for the power supply are also critical errors to avoid.