Achieving elegant overhead lighting in your home without the commitment or complexity of hardwiring might seem like a dream, especially for renters or those seeking flexible design solutions. Thankfully, the “swag” method for pendant lights offers a brilliant and stylish workaround. This technique allows you to transform any space with beautiful illumination, utilizing a simple plug-in fixture and a touch of creative cord routing. This comprehensive guide will walk you through everything you need to know, from selecting the right hardware to perfecting your installation for a seamless, professional look.
Understanding Swag Pendant Lights
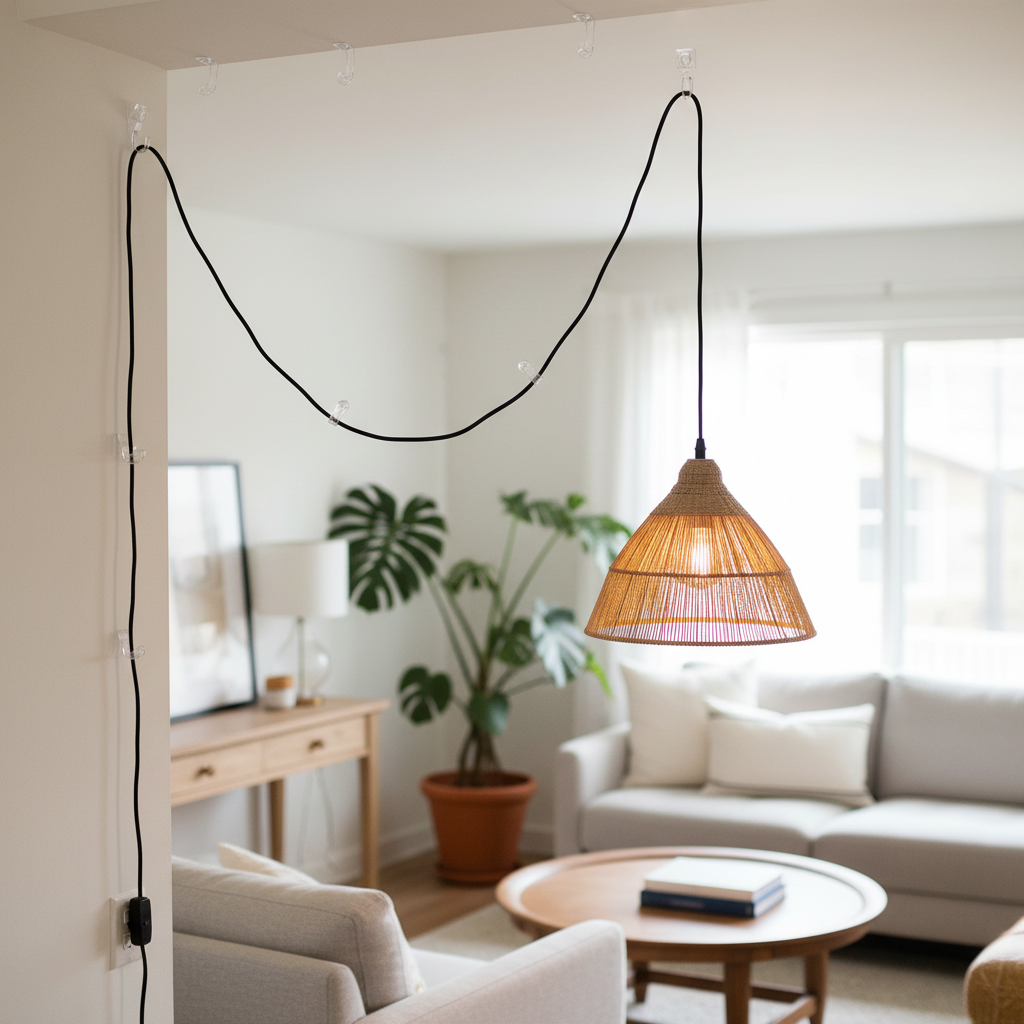
A swag pendant light is essentially a plug-in pendant fixture that hangs from a ceiling hook, with its power cord “swagged” or draped decoratively across the ceiling and down a wall to a standard electrical outlet. Unlike traditional hardwired pendants that require connection to an existing electrical box in the ceiling, swag lights offer unparalleled flexibility and ease of installation.
The primary appeal of swag lights lies in their non-permanent nature. They are ideal for rental properties where structural modifications are often prohibited, or for homeowners who want to experiment with lighting placement without costly electrical work. This method allows you to instantly upgrade your ambiance, create focal points, and introduce task lighting precisely where it’s needed, all without calling an electrician.
Essential Tools and Materials
Before you begin, gathering the right tools and materials will ensure a smooth and safe installation. Here’s a checklist of what you’ll likely need:
- Pendant Light Fixture: Choose a plug-in pendant with a sufficiently long cord for your desired swag path.
- Ceiling Hooks: These are crucial. Opt for hooks rated to support the weight of your pendant light. Decorative options are available to blend with your decor.
- Wall Anchors (if not drilling into a joist): For drywall installation, butterfly or toggle anchors provide secure support.
- Cord Clips or Channels: To neatly secure the cord along the ceiling and wall, minimizing unsightly dangling wires.
- Measuring Tape & Pencil: For accurate placement and marking.
- Drill & Drill Bits: Essential for creating pilot holes for hooks and anchors.
- Screwdriver: To tighten hooks or secure cord clips.
- Stud Finder: To locate ceiling joists for maximum security.
- Pliers (optional): Useful for adjusting chain length on some pendants.
- Step Ladder or Sturdy Stool: For safe access to the ceiling.
Step-by-Step Installation Guide (Drill Method for Maximum Security)
For the most secure and long-lasting installation, especially with heavier pendant lights, drilling into a ceiling joist or using robust wall anchors is recommended.
Step 1: Plan Your Placement and Height
|
Our Picks for the Best Living room ceiling light in 2026
As an Amazon Associate I earn from qualifying purchases.
|
||
| Num | Product | Action |
|---|---|---|
| 1 | Shine LUEST Modern LED Ceiling Light, Dimmable LED Chandelier Flush Mount Ceiling Lights, Remote Control Acrylic Ring Ceiling Lamp Fixture for Living Room Dining Room Bedroom (White, 8 Rings) |

|
| 2 | Shine LUEST Modern LED Ceiling Light Fixture Black Kitchen Lighting Fixtures Ceiling for Bedroom 31.5" Dimmable 6 Ring Square Ceiling Light for Kitchen with Remote Control for Living Room,Dining Room |
|
| 3 | RUIYEY Modern Chandelier Ceiling Light Fixture Sputnik Chandeliers Gold and Black Farmhouse Chandelier Over Table 12-Light Height Adjustable Chandeliers for Dining Room, Living Room,Kitchen Island |
|
| 4 | Modern LED Ceiling Light 7 Rings Dimmable Fixtures with Remote Black Close to Ceiling Light 31.8" 130W 3000K-6500K Flush Mount Ceiling Lamp for Living Room,Bedroom,Kitchen |
|
| 5 | Amico 24 Pack 6 Inch 5CCT Ultra-Thin LED Recessed Ceiling Light with Junction Box, 1050LM Brightness, Dimmable Canless Wafer Downlight, 12W, ETL&FCC |
|
| 6 | Modern LED Ceiling Light for Bedroom 31.5" Black Kitchen Lighting Fixtures Ceiling 3000-6500K Dimmable Square Ceiling Light with Remote Control for Living Room, Dining Room, Kitchen |
|
| 7 | MEIXISUE Gold Modern Sputnik Chandelier Ceiling Light Fixtures,6-Lights Industrial Metal Semi Flush Mount Ceiling Light for Bedroom Dining Room Living Room Kitchen Hallway UL Listed |
|
| 8 | Modern Ceiling Light, 36.2'' LED Dimmable Acrylic Square 6+1 Rings Ceiling Lights with Remote, Black Flush Mount Ceiling Light Fixture for Low Ceiling Bedroom Living Room Dining Room, 130W |
|
| 9 | 33" Modern Chandelier Ceiling Light Fixture, 12-Light Sputnik Chandeliers Brushed Gold and Black Mid Century Chandelier Over Table, Height Adjustable Chandeliers for Dining Room Living Room Kitchen |
|
| 10 | 36W Modern LED Ceiling Light Fixture, 19.7Inch Curved Wave Ceiling Lamp with Remote for Bedroom, Kitchen, Hallway, Foyer Library Dining Room Silver 6000K Modern Ceiling Light Fixture |
|
First, visualize where you want your pendant light to hang. Consider the room’s layout, furniture arrangement, and the primary purpose of the light (e.g., over a dining table, above a reading nook). Mark the exact spot on the ceiling directly above where the light will hang.
Next, determine the optimal hanging height. A general rule for dining tables is 30-36 inches above the tabletop. For open spaces, ensure the bottom of the fixture is high enough to not obstruct views or pathways. Use your measuring tape and mark the desired drop length on the pendant’s cord.
Step 2: Locate Joist or Prepare for Wall Anchor
Before drilling, use a stud finder to locate a ceiling joist at your marked placement. Drilling directly into a joist provides the strongest hold. If a joist isn’t available at your desired spot, you’ll need to use a sturdy wall anchor designed for ceilings. Mark the location for the anchor.
Step 3: Install the Ceiling Hook
If drilling into a joist:
Drill a pilot hole slightly smaller than the screw portion of your ceiling hook. Twist the ceiling hook into the pilot hole until it is firmly secured and snug against the ceiling.
If using a wall anchor for drywall:
Drill a hole according to the anchor manufacturer’s instructions (usually larger than a pilot hole for a joist). Insert the wall anchor into the hole, ensuring it’s flush with the ceiling. Then, twist the ceiling hook into the anchor until it’s secure. Gently pull on the hook to test its stability; it should feel solid.
Step 4: Hang the Pendant Light
Carefully unbox and assemble your pendant light if necessary, following the manufacturer’s instructions. Adjust the cord length to your predetermined height. Hook the pendant’s chain or loop onto the installed ceiling hook. Step back and ensure the light hangs evenly and at the correct height. Make any minor adjustments now.
Step 5: Route and Secure the Cord
This step is crucial for both aesthetics and safety. Decide on the path your cord will take from the ceiling hook to the nearest electrical outlet. It’s often best to route it discreetly along the edge of the ceiling and down a wall.
- Use Cord Clips: Along the chosen path, install cord clips at regular intervals (e.g., every 1-2 feet) to hold the cord neatly against the ceiling and wall. These can be clear, self-adhesive, or nail-in clips that blend in.
- Consider Cord Channels: For an even more integrated look, use paintable cord channels or covers. These hide the cord completely, giving the illusion of a hardwired fixture.
- Avoid Tripping Hazards: Ensure the cord runs safely and doesn’t create a tripping hazard, especially where it meets the floor.
Step 6: Test Stability and Functionality
Once the pendant is hung and the cord is secured, plug the light into the outlet. Turn it on to ensure it functions correctly. Finally, give the pendant and cord a gentle tug to reconfirm the stability of all hooks and clips. This final check ensures your installation is both beautiful and safe.
No-Drill & Renter-Friendly Alternatives
For those who cannot or prefer not to drill, several innovative solutions offer the charm of a pendant light without permanent alterations.
Adhesive Hooks (for Lightweight Fixtures)
For very lightweight pendant lights, robust adhesive hooks can be a temporary, no-drill solution. These hooks typically adhere to clean, smooth surfaces and can hold a surprising amount of weight if chosen carefully. However, always check the weight rating and test adhesion before committing. They are ideal for small, decorative pendants or paper lanterns.
Battery-Operated Pendant Lights
Advancements in lighting technology have brought forth stylish battery-operated pendant lights. These fixtures often feature puck lights or rechargeable LED bulbs that screw into a standard socket within the pendant shade. They require no wiring whatsoever, offering ultimate freedom in placement. Installation typically involves a small adhesive bracket or a simple hook to hang the fixture. Just remember to charge the batteries periodically.
Recessed Light Conversion Kits
If you have existing recessed lighting cans in your ceiling but desire a pendant light aesthetic, conversion kits are an excellent option. These kits allow you to screw a pendant fixture directly into the existing recessed light socket, transforming it into a hanging light without any hardwiring or drilling beyond the initial light fixture. This method offers a more polished, integrated look without the need for an external plug.
Design Tips for a Polished Look
The beauty of a swag pendant lies not just in its functionality but also in its aesthetic impact. A few design considerations can elevate your installation from temporary to tastefully integrated.
Cord Management is Key
Nothing detracts from a beautiful pendant more than a messy, dangling cord. Invest in high-quality cord clips, decorative cord covers, or even fabric-wrapped cords that complement your decor. Painting cord channels the same color as your ceiling or wall can make them virtually disappear. For a bold statement, embrace the cord as a design element, using unique colors or materials.
Choosing the Right Height and Scale
The correct height is paramount for both functionality and visual appeal. As mentioned, for dining areas, aim for 30-36 inches above the table. In other spaces, ensure the light illuminates the desired area without creating glare or obstructing views. The scale of your pendant should also be proportionate to your room and furniture; a too-small light will get lost, while an oversized one can overwhelm the space.
Balancing with Room Decor
Consider your overall interior design. A modern, minimalist pendant might pair well with sleek, clear cord clips. A rustic or industrial fixture could benefit from exposed, braided cords. The swag itself can be a design feature – a gentle curve or a sharp angle, depending on your desired aesthetic. Think about how the light fixture, cord, and hook contribute to the room’s story.
“A well-swagged pendant light isn’t just a lighting solution; it’s an intentional design choice that adds character and warmth to any room, often with minimal effort.” – Sarah Jenkins, Interior Lighting Designer
Common Mistakes to Avoid
While installing a swag pendant is straightforward, a few common pitfalls can compromise safety or aesthetics.
- Ignoring Weight Limits: Always ensure your ceiling hook and anchors are rated to support the full weight of your pendant light. Overloading can lead to damage or accidents.
- Poor Cord Management: Leaving cords loose or haphazardly tacked can look untidy and pose a tripping hazard. Plan your cord path and secure it meticulously.
- Incorrect Height: A pendant hung too high loses its impact, while one too low can be impractical or uncomfortable. Re-measure and adjust as needed.
- Forgetting to Test Stability: Always test the hook’s and fixture’s stability by gently pulling on them before considering the installation complete.
Conclusion
Swagging a pendant light without hardwiring is an ingenious and accessible way to introduce sophisticated overhead lighting into any home. Whether you’re a renter looking for temporary solutions, a homeowner seeking design flexibility, or simply intimidated by electrical work, this method offers a beautiful and practical alternative. By carefully planning your placement, selecting the right hardware, and diligently managing the cord, you can achieve a polished, custom lighting look that enhances your space without permanent commitment. Embrace the freedom and style that a well-installed swag pendant brings, illuminating your home with ease and elegance.
Ready to brighten your space? What creative ways are you planning to incorporate a swag pendant light into your home design?
Frequently Asked Questions
How do I hide the cord of a swag pendant light?
You can effectively hide the cord by using adhesive cord clips that match your wall color, investing in paintable cord channels that conceal the wire completely, or opting for decorative braided cords that complement your room’s aesthetic. Strategic placement along architectural lines also helps minimize visibility.
Are swag pendant lights safe?
Yes, swag pendant lights are safe when installed correctly. Ensure the ceiling hook and anchors are rated for the light’s weight, that all connections are secure, and that the cord is routed neatly to avoid tripping hazards or damage. Always follow manufacturer guidelines for both the light and installation hardware.
Can I use any pendant light as a swag light?
No, not all pendant lights are suitable for the swag method. You need a pendant light specifically designed as a “plug-in” fixture, meaning it comes with a power cord and plug, rather than bare wires intended for hardwiring into an electrical box.
How much weight can a ceiling hook hold for a swag light?
The weight capacity of a ceiling hook varies significantly based on its design and installation method. A hook screwed directly into a wooden ceiling joist can hold considerably more weight (often 25-50+ lbs) than one secured with a drywall anchor (typically 5-20 lbs). Always check the product specifications and your ceiling type.
Is swaging a pendant light a good solution for renters?
Absolutely! Swagging a pendant light is an excellent solution for renters as it typically involves non-permanent modifications, such as using removable adhesive hooks or small screw-in hooks that can be easily patched when moving. It allows for personalized lighting without violating lease agreements.
How high should a swag pendant light hang over a dining table?
For optimal illumination and visual balance, a swag pendant light should generally hang about 30 to 36 inches above the surface of a dining table. This height provides sufficient light without obstructing views or creating glare for those seated at the table.